Wet Look Lashes Of course! “Wet Look Lashes” is one of the biggest and most glamorous trends in the mascara and lash world right now. It’s all about creating a high-gloss, defined, and dramatic effect that makes your lashes look like they’re slicked back with a clear gel, similar to a wet, just-finished makeup look. Here’s a complete breakdown of everything you need to know about Wet Look Lashes.

What Are Wet Look Lashes?
- The Core Idea: Instead of seeking maximum volume or a soft, feathery finish, the goal is to create sharp, separated, glossy, and densely packed lashes that appear “wet” or “soaked.” The look emphasizes definition and drama over fluffiness.
Key Characteristics:
- High-Gloss Finish: Lashes look shiny, not matte.
- Extreme Separation: Each lash is perfectly defined and clumped together in sleek, sharp points.
- Dramatic Density: The look creates the illusion of a dense, full fringe, even if you don’t have naturally thick lashes.
- Sleek & Slicked: The lashes appear to be glued together in neat, sharp points, almost like little spikes.
How to Achieve Wet Look Lashes
You can create this effect with both mascara and eyelash extensions.
Method 1: With Mascara (The Most Common Way)
This requires a very specific type of mascara formula.
The Right Mascara Formula:
Look for mascaras described as:
- “Fibre” or “Tube” Mascaras: These are the holy grail for this look. They wrap each lash in tiny tubes, allowing for incredible length and separation without smudging.
- “Waterproof” or “Long-Wearing”: These formulas tend to be stiffer and better at holding a clumped-together shape.
- “Lash Glue” or “Lash Glue Primers”: Some people even use a tiny bit of clear lash glue brushed onto the lashes after mascara for an extreme, high-shine, glued-down effect.
Popular Mascaras for the Wet Look:
- Too Faced Better Than Sex Waterproof: Known for its dramatic, voluminous, and slick finish.
- Maybelline Sky High Waterproof: Excellent for length and separation, creating a defined, spiky effect.
- Thrive Causemetics Liquid Lash Extensions: A famous tube mascara that builds beautifully without flaking.
- Kevyn Aucoin The Volume Mascara: A cult classic for its ability to create intense, separated, and glossy lashes.
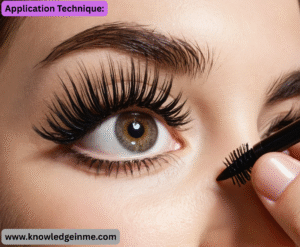
Application Technique:
- Curl Your Lashes: A strong lash curl is essential to open up the eyes against the weight of the product.
- Wiggle the Wand: Start at the very base of your lashes and wiggle the wand back and forth as you pull it through. This deposits the most product at the roots, which is key for the dense look.
- Press and Cluster: Instead of swiping to separate, use the wand to gently press lashes together into small, sharp clusters. You can use the tip of the wand to manually group a few lashes at a time.
- Focus on the Outer Corners: For a cat-eye effect, really concentrate the product and clustering on the outer lashes.
- Less is More (Initially): You can always add more coats, but too much too fast can lead to spider-leg lashes instead of a sleek wet look. 2-3 coats is usually the sweet spot.
Method 2: With Eyelash Extensions
This is a more permanent solution and requires a skilled lash artist.
- The Style: You would ask for a “Wet Set” or “Spiky Set.”
- The Technique: The lash artist will apply multiple lash extensions (usually classic or hybrid) to one natural lash, creating dense, sharp points. They are meticulously placed to create that intentional, clustered, and glossy effect.
- Advantage: You wake up with perfect wet look lashes every day without any makeup.
Pros and Cons
Pros:
- Highly Dramatic: Makes a bold statement and is perfect for a night out, photoshoots, or editorial looks.
- Opens the Eyes: The sharp points and dense root definition can make eyes appear larger and more awake.
- Trendy & Modern: It’s a very current, fashion-forward look.
Cons:
- Can Be Tricky to Master: It’s easy to cross the line from “intentionally sleek” to “accidentally spidery.”
- Requires Specific Products: Not every mascara can achieve this effect.
- Not for Everyday (For Some): The high-drama effect might be too much for a casual, daytime look for some people.
Advanced Techniques & Pro Tips
The Lash Primer Secret:
- Don’t underestimate a good lash primer. It adds thickness and a sticky base that mascara can really cling to. For the wet look, a white primer can be especially effective—after applying your dark mascara, the tiny bits of white that peek through at the base can enhance the dimensional, glossy effect.
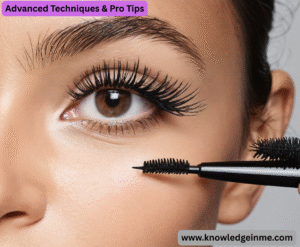
The Two-Mascara Method:
This is a game-changer for creating a custom, long-lasting wet look.
- Step 1: The Builder. Use a more liquid, fibrous mascara (like a tube mascara) as your first coat. This creates the length and the “structure” of your lash spikes. Let it dry completely.
- Step 2: The Finisher. Use a thicker, waxier waterproof mascara as your second coat. This is what you use to press and cluster the lashes together, sealing the shape and adding that high-gloss, “wet” finish.
The Tool Kit:
- Your fingers and other tools are just as important as the mascara wand.
- Eyelash Comb or Pin: For separating any major clumps before you intentionally create your clusters. A clean, fine-tooth lash comb or even a safety pin can be used with extreme care.
- A Clean Spoolie: To brush through lashes after the primer and before the first coat of mascara for even distribution.
- Your Fingertips or a Orange Stick: Once your final coat is still slightly tacky, you can gently press the tips of your lashes together with your fingers to sharpen the points.
The “Underlash” Technique:
- For an even more intense, 360-degree wet look, don’t forget your bottom lashes.
- Use the very tip of your mascara wand to carefully apply product to your lower lashes.
- Press them slightly together in a downward direction to create smaller, defined spikes that mirror the top lid. This frames the eye dramatically.
Styling & Makeup Pairing
- The wet lash look is powerful, so the rest of your makeup should complement it, not compete with it.
- Skin: Flawless, glowy skin is the perfect pairing. A dewy foundation or tinted moisturizer with highlighter on the high points (cheekbones, brow bone) enhances the “wet” theme.
Eyeshadow:
- Modern Minimalist: A bare lid with just a wash of a neutral, shimmer shadow or even a slick of cream shadow. This lets the lashes be the absolute star.
- Smoky & Sultry: A deep, smoked-out black or brown eyeliner blended into the crease creates an intense, editorial bed for the wet lashes.
- Metallic Pop: A bold, glossy eyelid in silver or gold creates a high-fashion, cohesive wet look from lid to lash.
- Eyeliner: A sharp, graphic winged liner complements the sharpness of the lashes. Alternatively, a tightlined upper waterline (lining between the lashes) adds to the dense, root-level drama without taking up lid space.
- Brows: Well-groomed, defined brows help frame the dramatic eye look. A soap brow or laminated brow effect, which has a slightly textured and set-in-place feel, pairs beautifully with the intentionality of the wet lash.
Lips:
- Nude or Neutral: Keeps the focus entirely on the eyes.
- A Bold Red: For ultimate, timeless glamour.
- A High-Gloss Lip: To double down on the “wet” aesthetic across the entire face.
The “Why” Behind the Trend: A Cultural Shift
The wet lash trend isn’t just random; it reflects a broader shift in beauty ideals:
- The “Undone-Done” Look: It’s part of the larger trend of beauty that looks intentional, almost like you’re backstage at a fashion show or just finished your makeup. It’s glamorous but not “perfect” in a traditional, soft-focus way. It embraces texture and artifice.
- Influence of Lash Extensions: As lash extensions became ubiquitous, trends moved away from trying to mimic “natural” lashes and towards more artistic, stylized lash looks that only extensions (or advanced mascara techniques) can achieve.
- The Rise of “Editorial” Makeup: Social media, especially TikTok and Instagram, has made high-fashion, runway-inspired makeup accessible. People are more willing to experiment with bold, artistic statements like the wet lash in their daily lives.